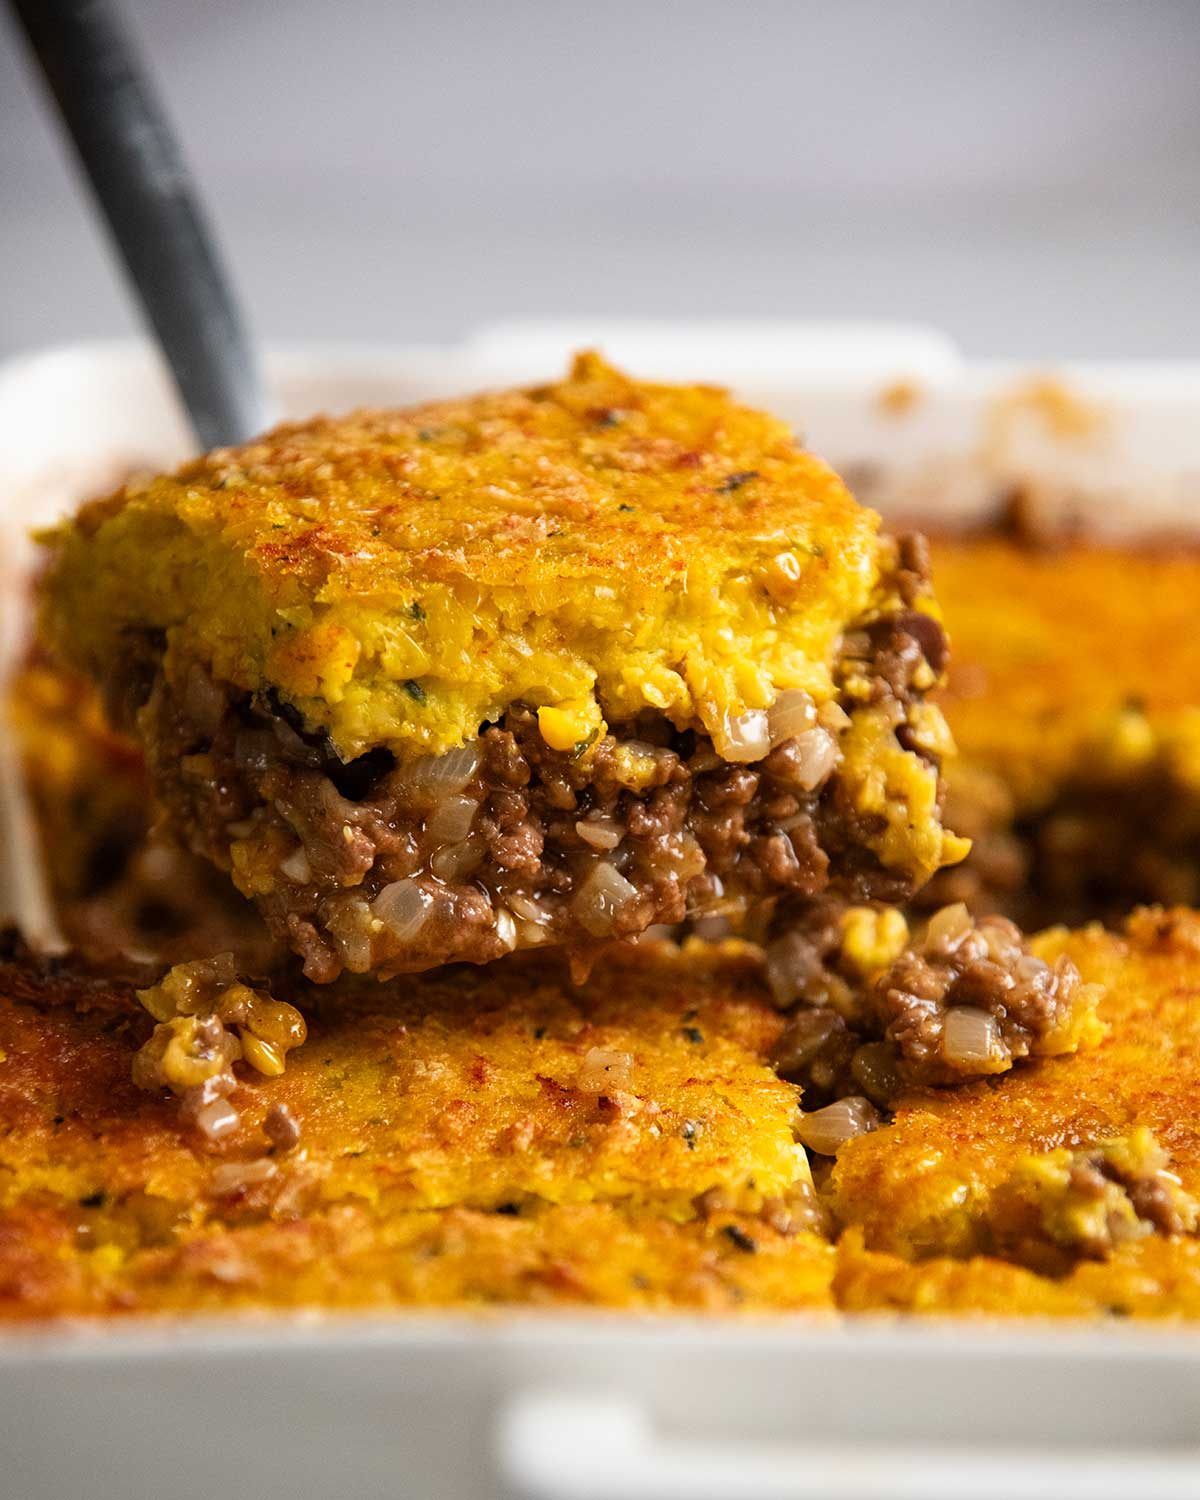
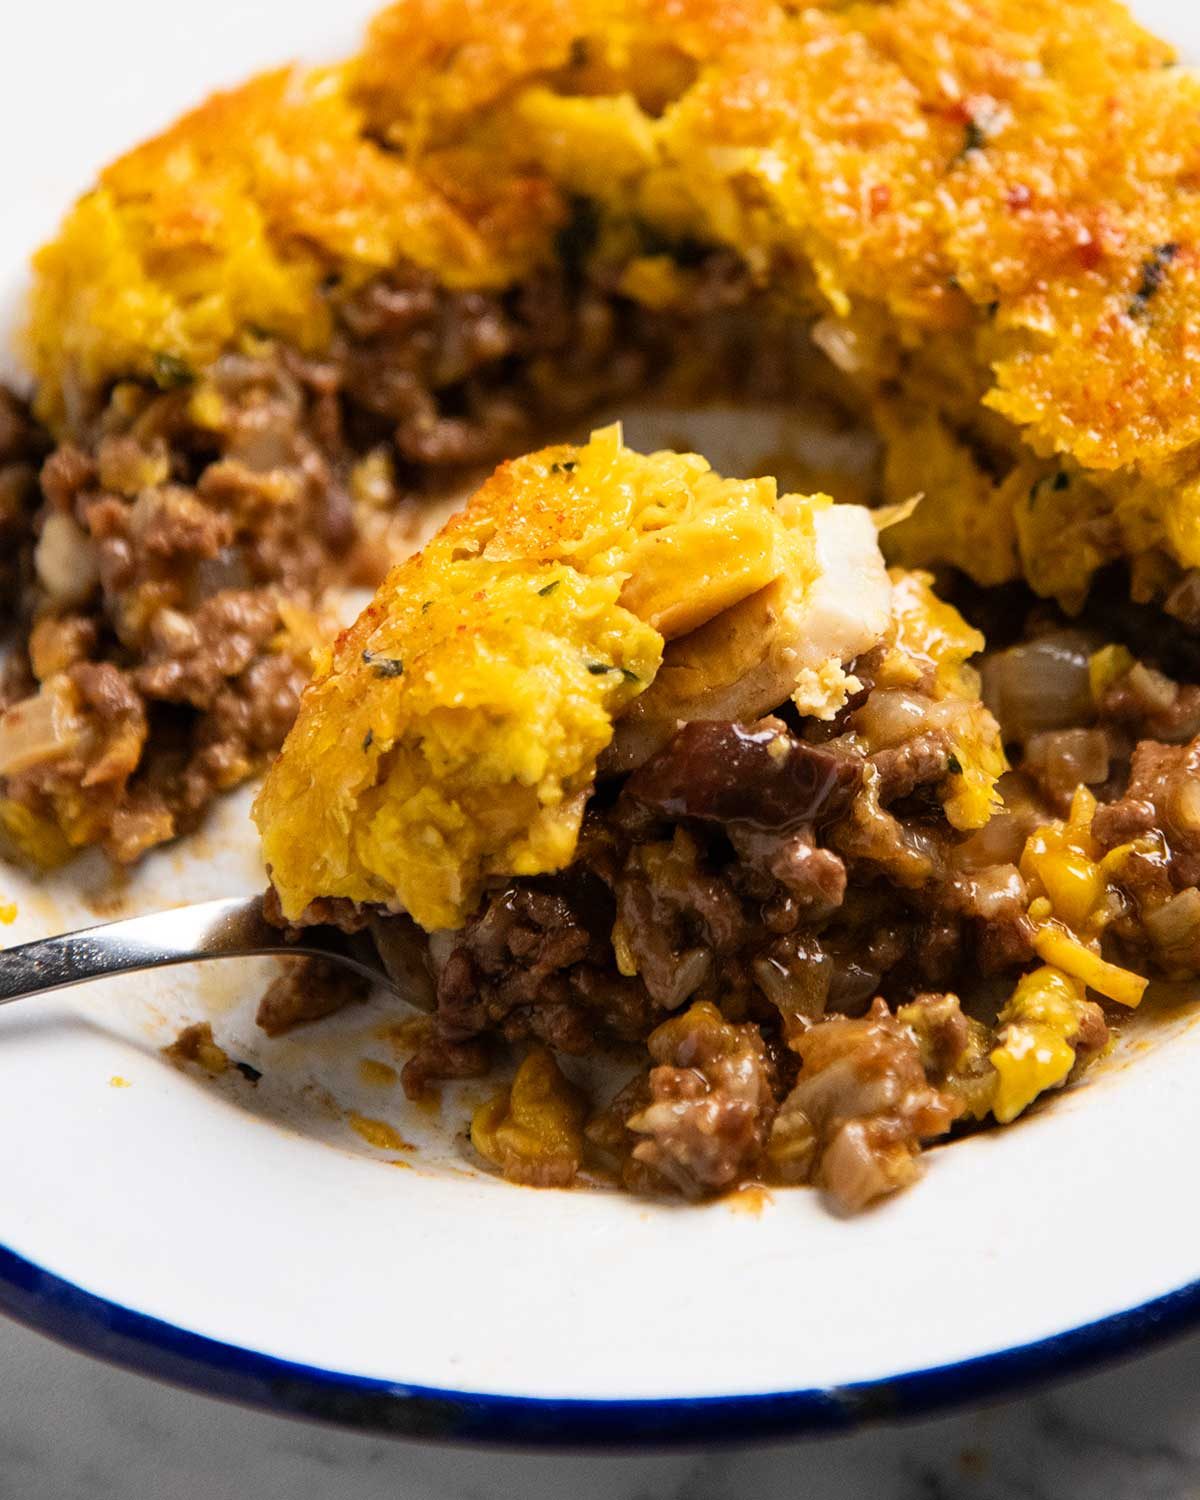
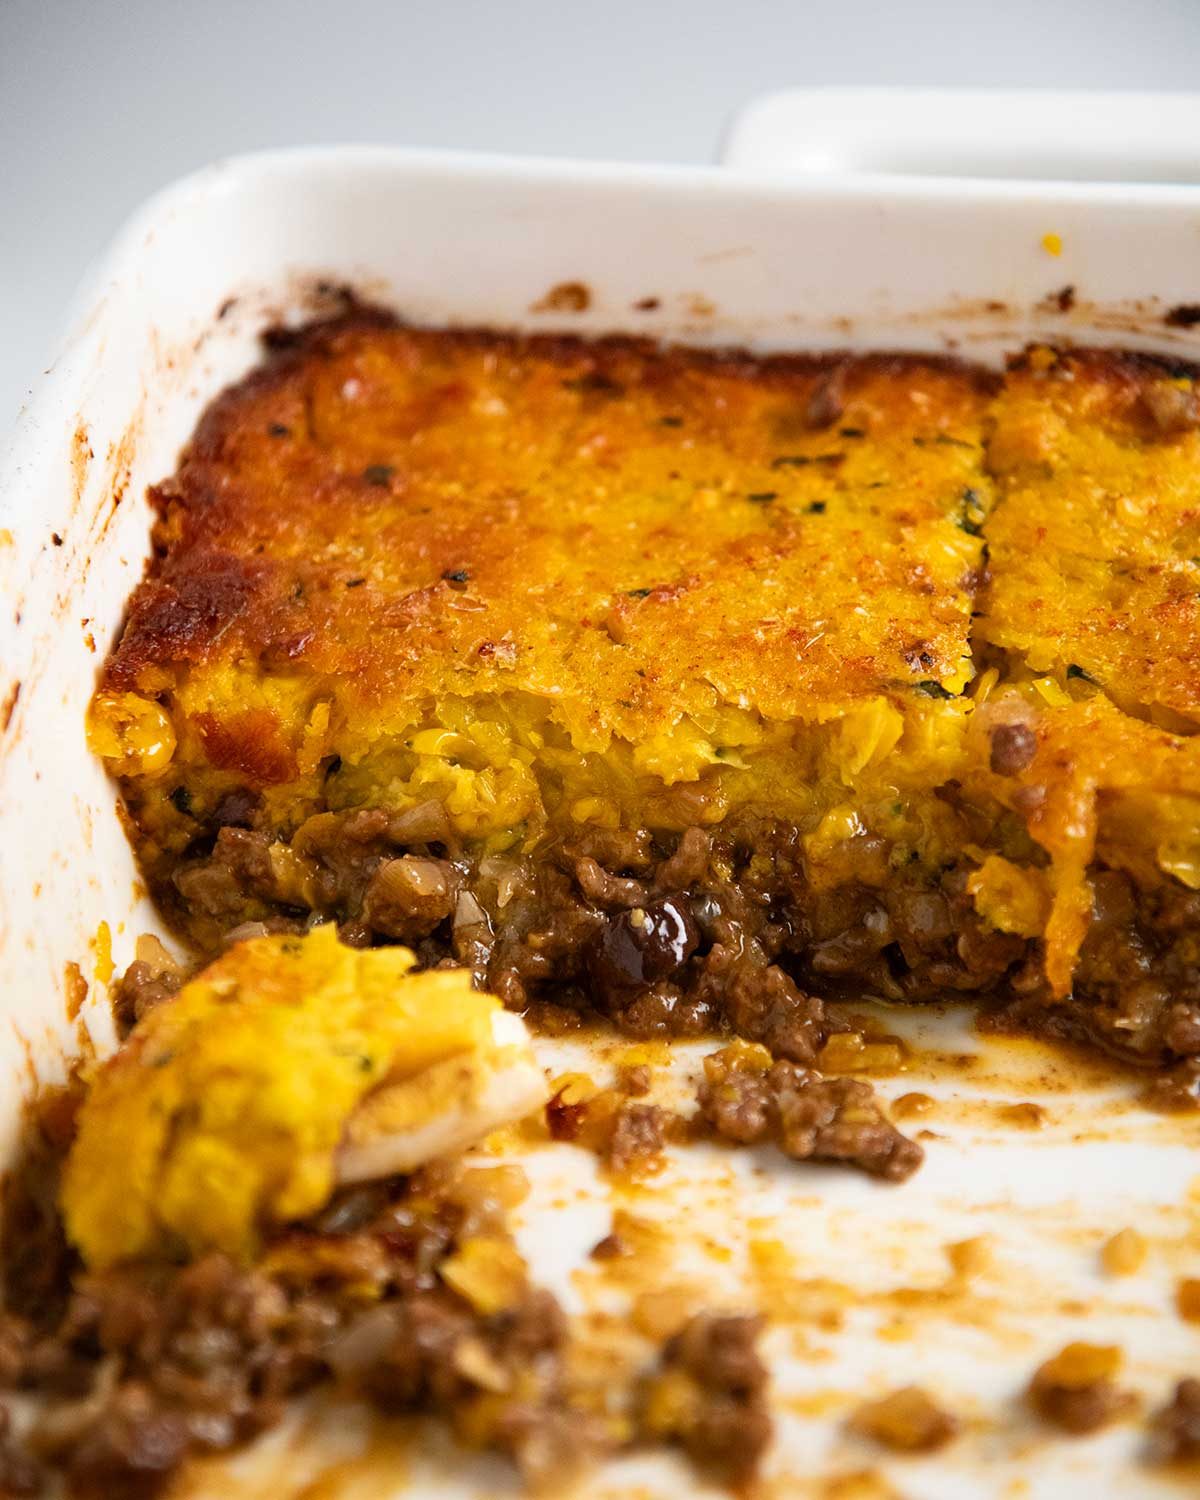
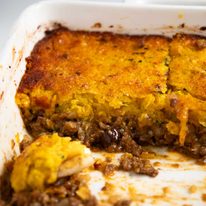
Pastel de Choclo is a traditional Chilean dish with a savoury onion beef filling topped with a thick layer of corn pudding, and surprise pockets of olives, raisins and boiled egg tucked inside. Officially my favourite way to turn beef mince and a huge bag of frozen corn into dinner!
Contents
- 1 A day out in Fairfield and Pastel de Choclo
- 2 What is Pastel de Choclo?
- 3 Ingredients in Pastel de Choclo
- 4 How to make Pastel de Choclo
- 5 What to serve with Pastel de Choclo
- 6 Recipe credits and authenticity note
- 7 Watch how to make it
- 8 Pastel de Choclo (Chilean Beef and Corn Casserole)
- 9 Remembering Dozer
A day out in Fairfield and Pastel de Choclo
The RecipeTin team spent a day in Fairfield, a wonderful multi-cultural suburb in western Sydney with a terrific food scene. It’s especially known for Middle Eastern communities (Lebanese, Iraqi and Assyrian) and Latin American roots, with bakeries, grocers and family run diners everywhere.
It was here that our resident walking food encyclopaedia (my brother) introduced us to a Chilean establishment called La Paula and JB showed off his Spanish speaking skills as he ordered a variety of Chilean classics from completo (Chilean hot dogs) to lomito (pork sandwiches), empanadas to Pastel de Choclo!

What is Pastel de Choclo?
Pastel de Choclo is Chile’s answer to a cottage pie, but with a sweet-savoury twist that makes it completely its own and uniquely South American. A juicy, well-seasoned beef filling is dotted with olives, littered with raisins with pockets of boiled egg, topped with a thick layer of corn pudding that’s naturally sweet and baked until golden. It sounds unusual on paper, but one bite is all it takes to know it just works – comforting, moreish, and exactly the kind of food that tells you everything about a culture in a single spoonful. 🙂 South Americans know good food!!


Ingredients in Pastel de Choclo
Here’s what you need to make this. And in case you’re wondering, 1.25kg / 2.5 lb of corn is not a typo, we need a LOT to make the signature thick layer of corn pudding!!
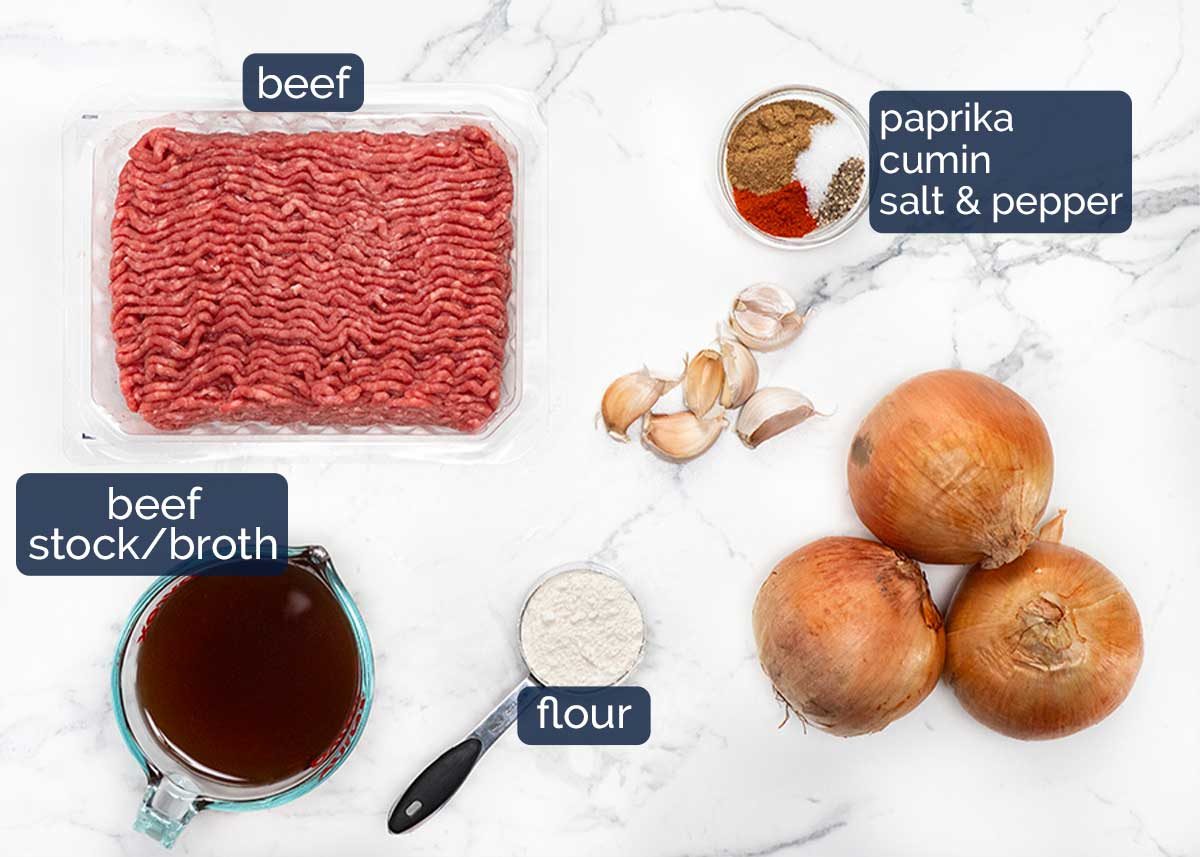
1. The beef filling
This filling is onion loaded – we need 3 big ones, or 4 to 5 medium ones. It fills it out as well as being a key flavouring here. So don’t skimp on it!
-
Beef mince (ground beef) – This recipe calls for 1 kg / 2 lb of beef, we’re making a big casserole! Feel free to use low fat if you want, but I like using regular as the fattier meat has better beef flavour (the fat is where much of the flavour is).
-
Onion – As mentioned above, we need 3 BIG onions, or 4 to 5 medium ones.
-
Garlic – Where there is onion there is usually garlic! Use 6 big cloves.
-
Spices – Just paprika and cumin is all we need. Heads up: I use double the typical amount you see in recipes. I initially tried a more normal quantity (usually 1 to 2 teaspoons of each) but just found I couldn’t really taste much in the filling, so I kept dialling it up and up and landed on 1 tablespoon of paprika and 1 1/2 tablespoons of cumin before I finally thought yup, I can taste the spices enough, yay!
-
Beef stock / broth – From my research, it seems like most recipes opt for water instead but using stock makes a tastier sauce. Essentially we’re making a thick gravy here which moistens the beef filling.
-
Flour – This thickens the sauce into a gravy that clings to the beef rather than running watery. I use a little more than typical recipes so there’s enough sauce to keep the filling juicy, not dry, but thick enough so you can just scoop up a slice like lasagna without the beef filling running everywhere!
(PS How many times did I say the word BIG in that section? 🤣)
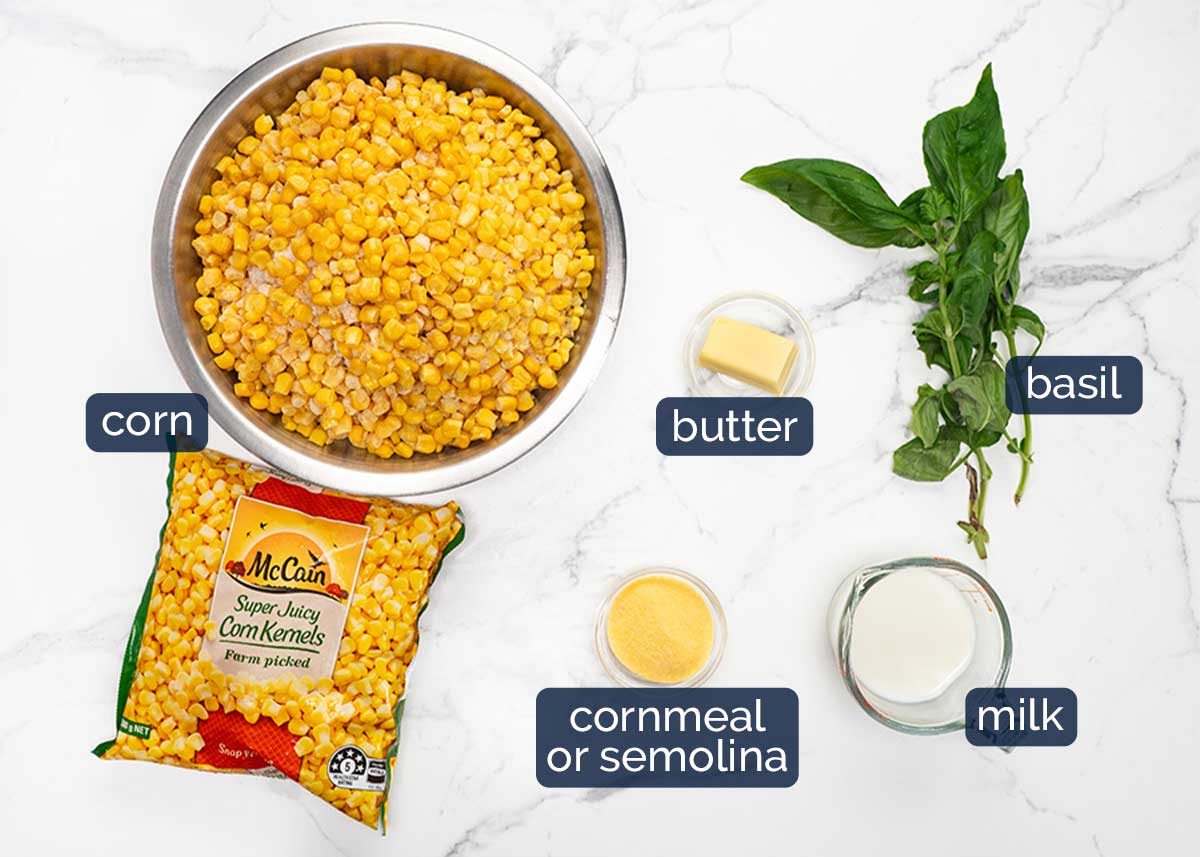
2. CORN TOPPING
I love that this works beautifully with frozen corn, though I’m keen to try it with fresh kernels next summer. And while basil is typical in Chilean versions and adds a subtle herbiness that works so well with sweet corn, it’s not the end of the world if you dom’t include it. I wouldn’t make a special trip to the shops just to get it …… unless a Chilean was coming to dinner. 😅
-
Corn – As mentioned above, frozen corn is a perfect handy option though if you can get your hands on fresh corn kernels, then wow! And yes, you are reading it right, the recipe calls for 1.25 kg (2 1/2 lb) of corn – 8 cups. Pastel de Choclo is supposed to have a thick layer of the corn pudding, almost as thick as the meat layer. Some recipes are even thicker!
-
Fine cornmeal or semolina – Just 2 tablespoons lightly thickens the mixture so it holds together enough to slice. The cornmeal needs to be fine, not the more common coarse ground (too gritty). Otherwise, semolina is a near perfect substitute, and plain flour works just fine too – to be honest, I couldn’t tell the difference. 🙂
-
Basil – Just 12 or so leaves, for fresh herby flavour. A traditional herb included in the corn pudding layer, though as mentioned above, it’s not the end of the world if you leave it out (I’ve seen Chilean recipes without).
-
Butter – For sautéing the corn.
-
Milk – Just a bit, to loosen the mixture slightly to make it easier to blitz, then it’s mostly cooked out to thicken the corn mixture so it sets into a pudding when baked.
Sweetness note – I have seen recipes that add sugar and/or sweetened condensed milk into the corn pudding layer. South Americans love sweet! I personally find the corn sweet enough, and opt for just sprinkling the surface with a little sugar which caramelises in the oven (it’s so good!).
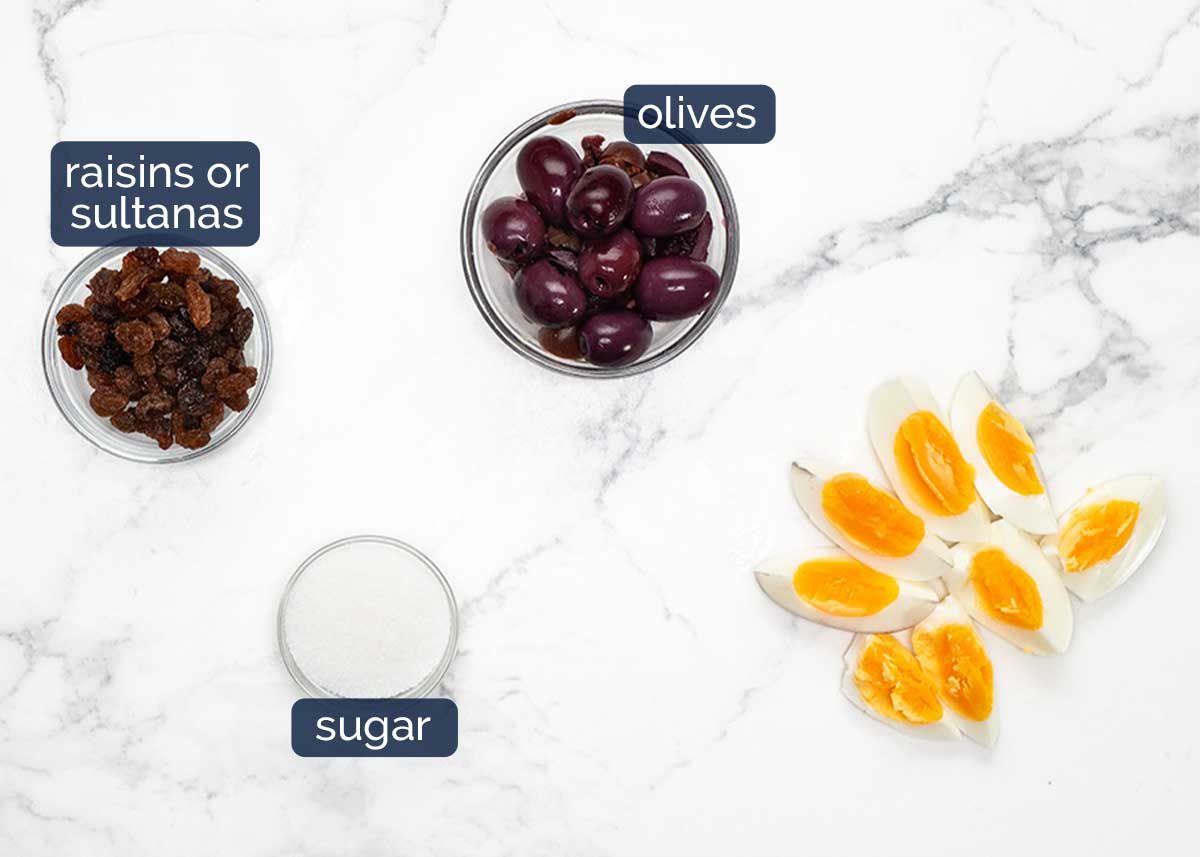
3. THE FINISHING TOUCHES
OK! These are the things that make this dish interesting and really sets it apart from Cottage Pie! 🙂 The pops of briny saltiness from olives and the sweetness of raisins bring contrast and little surprises against the beefy filling and sweet corn pudding layer.
-
Raisins – The traditional option, though sultanas work just as well.
-
Olives – Black olives are the traditional option. If you happen to walk past a South American grocery store, grab a jar of Chilean black olives (Aceitunas Negras) though if you don’t, Kalamata olives will do the job nicely (I prefer the softer texture over better value black olives).
-
Soft boiled eggs – Soft boiled is best so they don’t get pushed into over-cooked-grey-band territory after the oven bake time.
-
Sugar – Just 1 tablespoon to sprinkle on the surface which creates a light layer of crispy caramelisation and is just chef’s kiss!
-
Forgot paprika 🙂 For a light sprinkle of red colour against the golden corn topping. Optional!
How to make Pastel de Choclo
It takes longer than a bolognese, but it’s less effort than a lasagne! And remember, it’s a big casserole that will serve 8 adults, and leftovers keep well. 🙂
We will start by cooking the beef filling, then let it cool slightly in the casserole dish while we make the corn topping. This helps the beef filling firm up, making it easier to spread the corn evenly over the top.
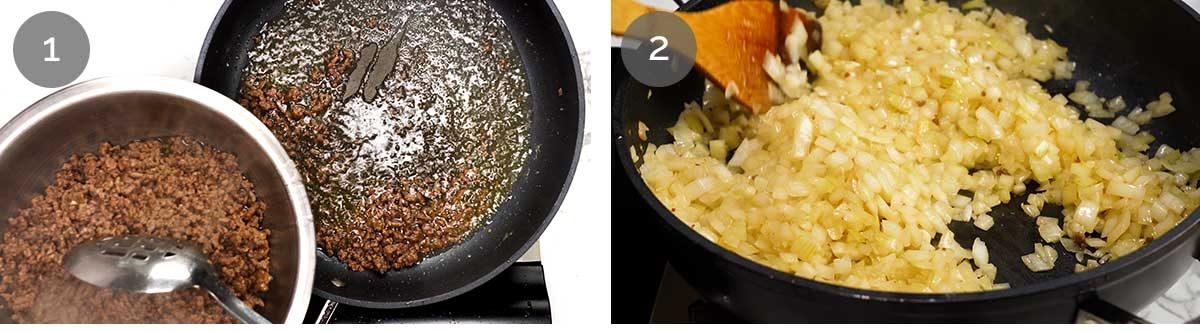
1. BEEFY FILLING
Because of the volume of beef and onion, cook them separately as there’s too much to fit in one pan. Otherwise, they’ll steam instead of brown, leaving you with watery beef due to overcrowding and insufficient heat.
-
Brown beef first – In a large 30cm / 12″ non-stick pan, heat the oil on high heat until hot. Add the beef and cook it, breaking it up as you go, until you no longer see red. Remove the beef into a bowl using a slotted spoon, leaving the fat in the pan.
-
Cook onion – Still on high heat, add the onion and cook for 5 minutes or until the onion is translucent.
-
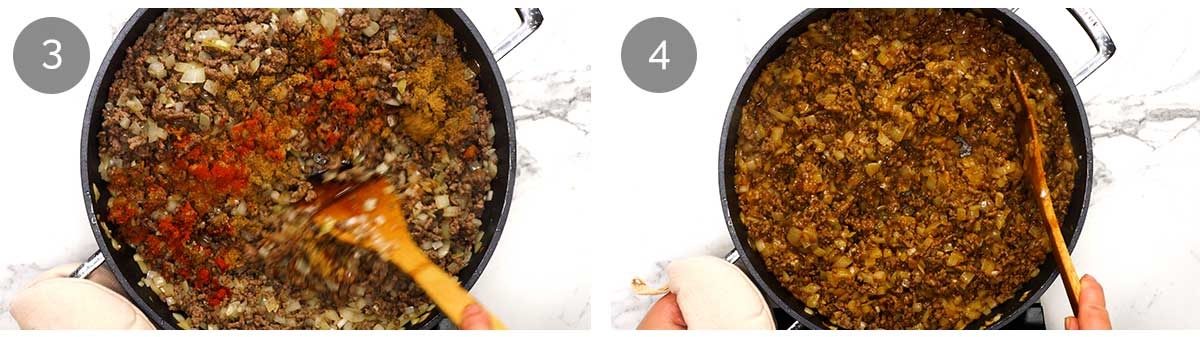
Return beef into the pan and stir in the spices.
-
Thick sauce – Add flour and stir it in until you can no longer see it. Then add the stock and stir – it will thicken into a gravy quite quickly, coating the beef.
-
Cook 5 minutes – Lower the heat to medium and cook for 5 minutes, until the mixture is thick enough that you can draw a path across the base of the pan and it holds. Don’t let it dry out though, nobody wants a dry beef filling, we want it gravy-juicy!
-
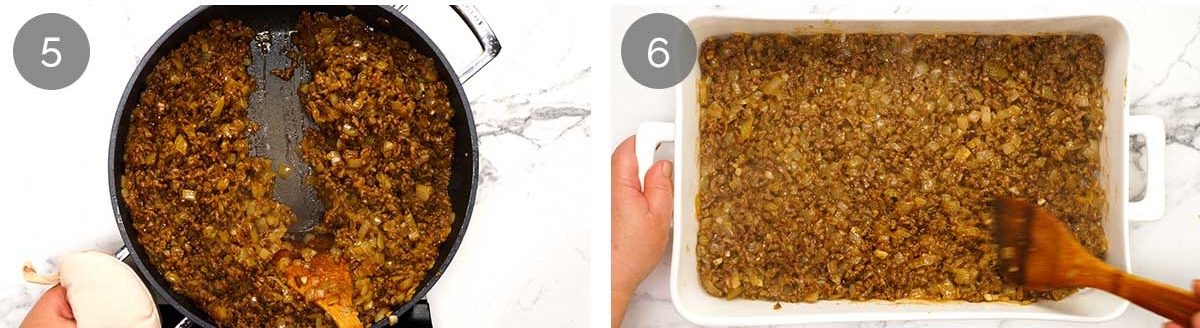
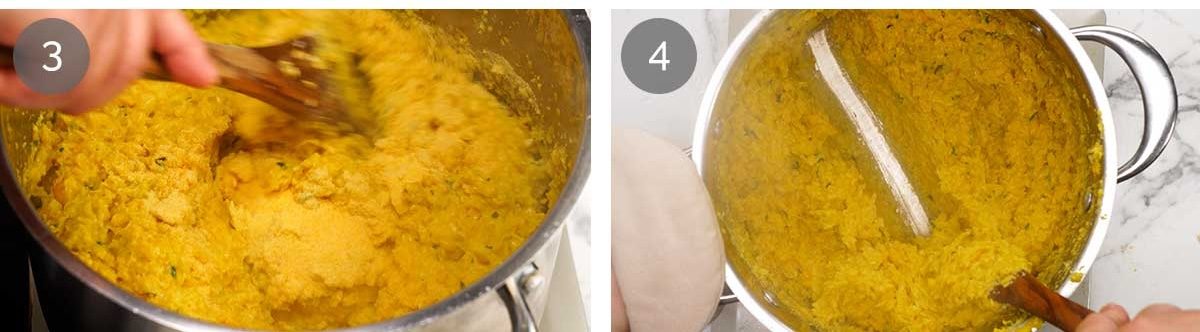
Spread in pan – Transfer the beef into a 23 x 33 cm (9 x 13″) casserole pan and spread it out so the surface is level. Let it cool while you make the corn topping.
2. CORN TOPPING
You wouldn’t think that a mixture made almost entirely with corn with no eggs or flour to bind would set enough in the oven, but it does! Cooking the pureed corn to thicken it is key here, so don’t shortcut the cooking time.
-
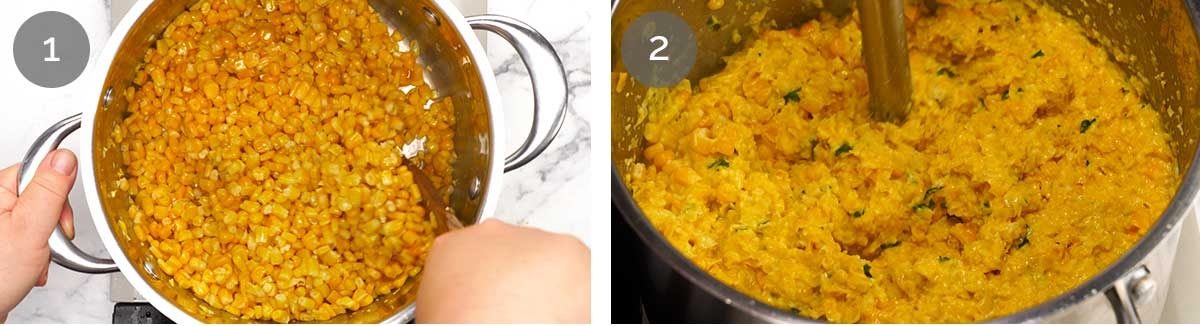
Cook frozen corn in melted butter in a large pot for 5 minutes. This is mostly to thaw the frozen corn, or if you are using fresh corn then this step will partially cook the corn, enough so it will easily puree.
-
Blitz – Add milk, salt and basil. Stir, then use a stick blender to blitz ~ 30 seconds (moving it around) until you no longer see whole corn kernels. It won’t be complete smooth because the skin of the kernels won’t fully puree which is what you want, it provides welcome texture in the corn layer.
-
Cook 5 minutes to thicken – Stir in cornmeal then lower heat to medium or medium low so it’s not spitting. Cook for 5 minutes, stirring regularly so the base doesn’t catch.
-
Thickness – The corn mixture should be thick enough to mound in a heap on the spoon, and when you draw a path across the base it should stay in place. If your mixture is looser than this, then the corn layer won’t set as much when it is baked. It will still taste great though!
Corn mixture done. Now, let’s finish assembling so we can get this in your belly!
3. ASSEMBLE AND BAKE
-
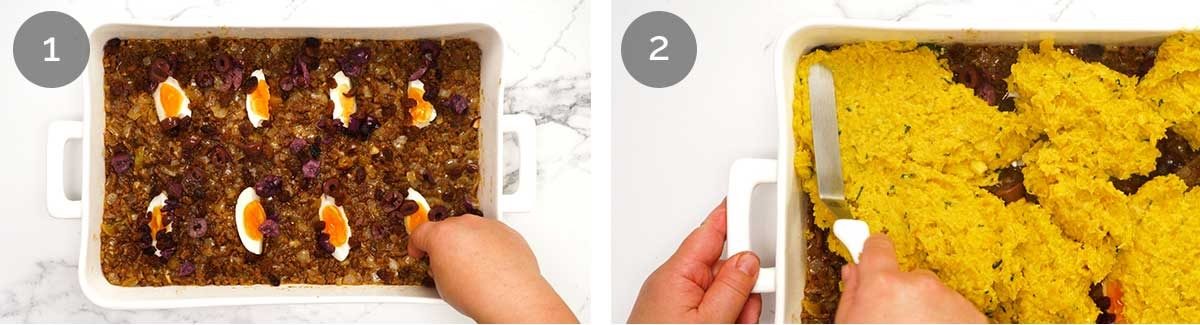
Egg, olives and raisins – Press the quartered eggs into the beef. I make an indent in the beef slightly to nestle it into the beef (you don’t have to do this), and I arrange them so each serving – assuming 8 servings – will get a piece of egg (you don’t have to do this either!). Then scatter with the olives and raisins.
-
Corn topping – Dollop the corn mixture across the surface then spread and smooth the surface.

-
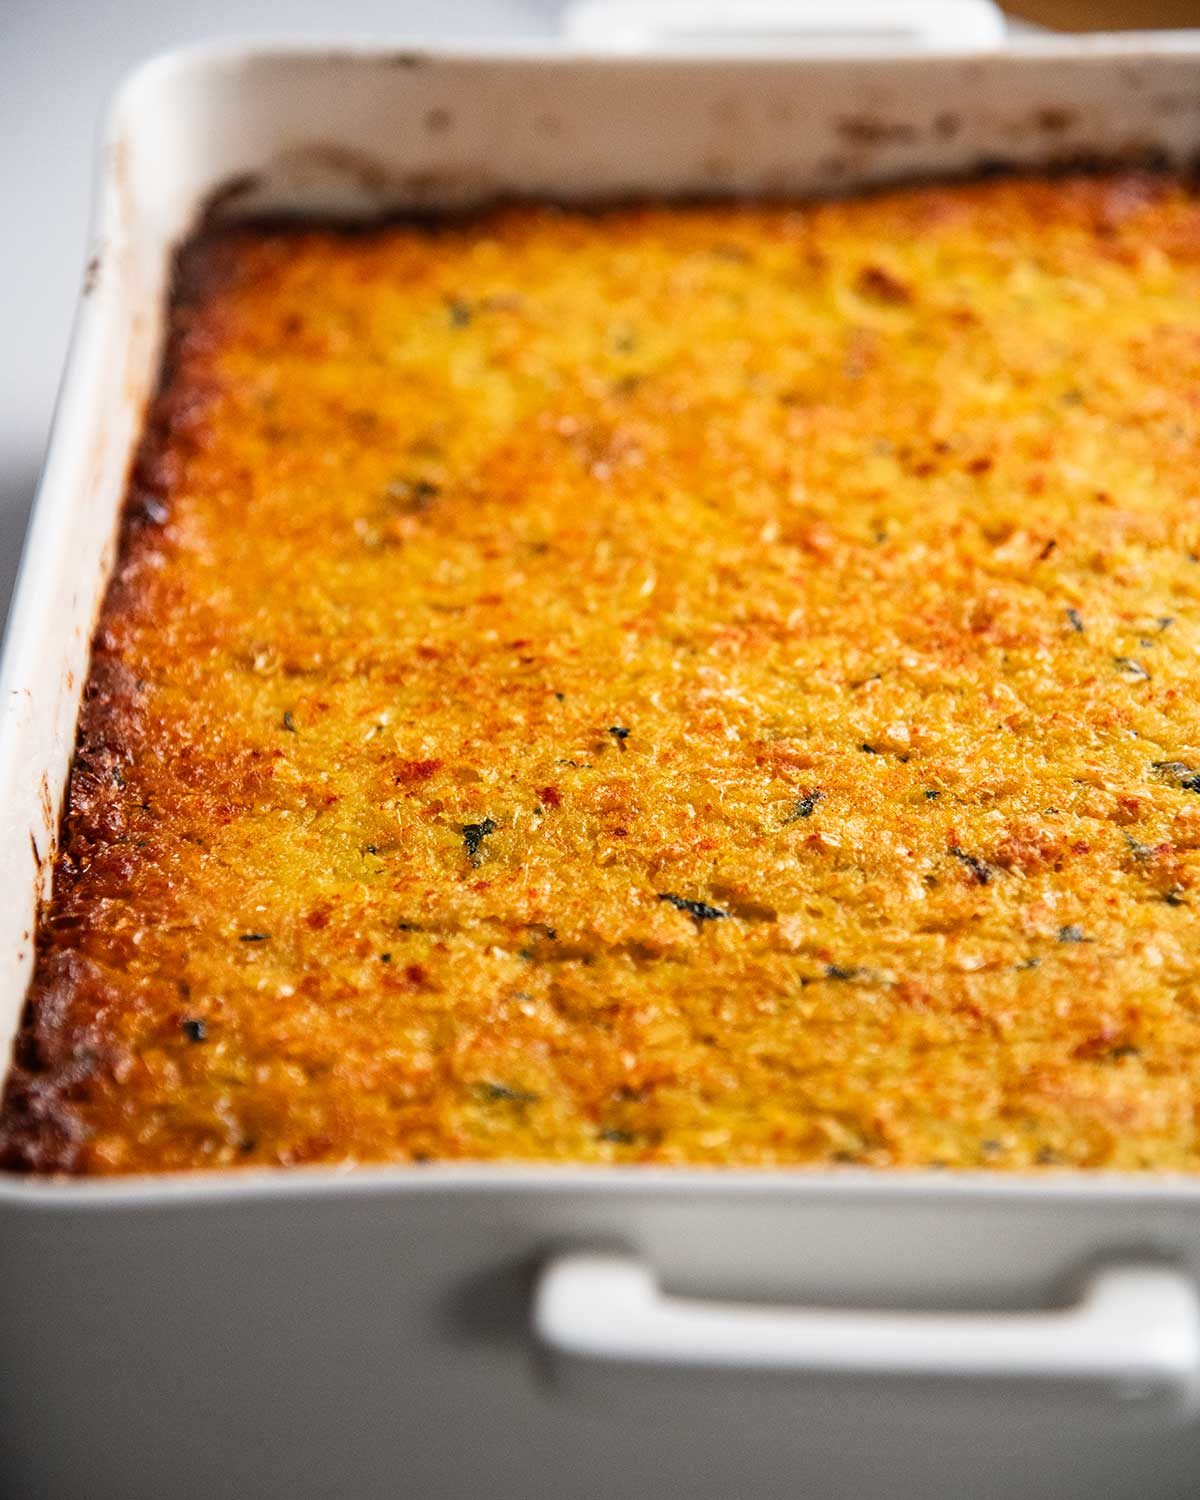
Sprinkle all over with the sugar, then paprika (sprinkle from a height for light coverage).
-
Bake for 45 minutes until the surface is golden. Cool 15 minutes to let it set a bit so you can cut slices, then cut and serve like you would a lasagna!
What to serve with Pastel de Choclo
Serve your Pastel de Choclo with a fresh, light side salad to balance the richness of all the sweet corn and beefy goodness. The first thing that comes to mind is this Cucumber Salad with Herb Garlic Vinaigrette (fresh-juicy-cucumber-crunchiness is an appealing thought) else this no-mayo Everyday Cabbage Salad or a perky Garden Salad. If tomatoes are in season where you are (they are not here) and looking for a way to use up basil leftover from this recipe, try My favourite Tomato Salad (it is seriously so good, JB taught me how to make it) or this Cherry Tomato Salad.
Love to know what you think if you get a chance to try today’s recipe! Especially the corn pudding layer. I just can’t get enough of it! – Nagi x
Recipe credits and authenticity note
There’s no single “right” way to make Pastel de Choclo – every Chilean family has their own spin. There are actually different versions and forms across South America – cake form, layered casseroles, individual portions, some are made with chopped beef, some have chicken added as well.
I based my version on a bunch of recipes I found online, including Serious Eats, New York Times Cooking and Chilean Food and Garden, plus watching home cooks on YouTube including this one, this one and this one.
Once I got a feel for the basics and what defines a classic Chilean Pastel de Choclo, I pulled together a mash-up of those recipes and tweaked it to get as close as possible to the one we had at La Paula (though theirs is looser than mine, I wanted an almost slice-able version), with plenty of input from my brother Goh who ate his way across Chile.
Watch how to make it
Hungry for more? Subscribe to my newsletter and follow along on Facebook, Pinterest and Instagram for all of the latest updates.
Pastel de Choclo (Chilean Beef and Corn Casserole)
Prep: 20 minutes
Cook: 1 hour 15 minutes
Cooling: 15 minutes
Total: 1 hour 50 minutes
Main
Chilean, South American
Servings8
Tap or hover to scale
Prevent screen from sleeping
Instructions
Beef filling:
-
Cook beef – Heat the oil in a large 30cm/12″ pan over high heat. Add the beef and cook, breaking it up as you go, until you no longer see red. Cook for another couple of minutes, breaking up the beef into fine pieces. Remove beef from the pan using a slotted spoon, leaving the fat and juices behind.
-
Cook onion – To the same pan, add the onion and garlic. Cook for 5 minutes, stirring regularly, until the onion is translucent.
-
Simmer and reduce – Add the beef and mix through. Stir in the spices. Add the flour and mix until you no longer see flour. Add the stock and stir – it will thicken into a gravy quite quickly, coating the beef. Lower heat to medium and cook for 5 minutes, stirring regularly so the base doesn’t catch, until the mixture is thick enough so you can draw a path across the base of the pan and it stays.
-
Remove from stove and spread in a 23 x 33 cm (9 x 13″) pan, then set aside and let it cool while you make the corn.
Corn layer:
-
Sauté – Melt the butter in a pot over medium high heat. Add corn (still frozen is fine) and cook for 5 minutes, stirring regularly.
-
Blitz – Add milk, salt and basil. Stir, then use a stick blender to blitz ~ 30 seconds (moving it around) or until you no longer see whole corn kernels. It won’t be complete smooth which is what you want.
-
Thicken – Stir in cornmeal. Lower heat to medium or medium low so it’s not spitting. Cook for 5 minutes, stirring regularly so the base doesn’t catch. It should be thick enough to mound in a heap on the spoon, and when you draw a path across the base it should stay in place.
Assemble and bake:
-
Assemble – Press the eggs into the beef, scatter with olives and raisins.
-
Corn topping – Dollop the corn mixture across the surface then spread and smooth the surface. Sprinkle all over with the sugar, then paprika (sprinkle from a height for light coverage).
-
Bake for 40 – 45 minutes until the surface is golden. Cool 15 minutes to let it set a bit so you can cut neat(ish) slices, then cut like lasagna and serve!
Recipe Notes:
2. Cornmeal is typically used to thicken the corn pudding layer so it sets in the oven. Use fine ground cornmeal, not the coarser ground that is more common in Australian grocery stores which leaves grit. Else, use semolina (it’s a direct substitute, you can’t tell the difference) or regular plain flour/all-purpose flour (I couldn’t tell the difference with this either!).
3. Sugar – Best to use regular / granulated sugar which are coarse than caster sugar (superfine sugar) which is so fine it sinks into the corn layer before it caramelises.
4. Recipe credits – Adapted from recipe sources found online, as listed in the blue box above the video (it’s lengthy)!
Leftovers will keep for 3 – 4 days in the fridge. It freezes ok though the corn layer gets a little softer than ideal to me.
Nutrition per serving assuming 8 servings.
Nutrition Information:
Calories: 537cal (27%)Carbohydrates: 48g (16%)Protein: 35g (70%)Fat: 25g (38%)Saturated Fat: 9g (56%)Polyunsaturated Fat: 2gMonounsaturated Fat: 11gTrans Fat: 1gCholesterol: 135mg (45%)Sodium: 841mg (37%)Potassium: 1018mg (29%)Fiber: 6g (25%)Sugar: 11g (12%)Vitamin A: 1091IU (22%)Vitamin C: 12mg (15%)Calcium: 73mg (7%)Iron: 5mg (28%)
Remembering Dozer
No reason in particular for sharing this, other than my phone bringing back memories of this day in years gone by, and here’s what popped up. Today 3 years ago, I moved out of my dream home in the Northern Beaches of Sydney, back to the Ryde area to be closer to my foodbank RecipeTin Meals. ❤️
Amongst the boxes and bubble wrap, Dozer parked himself right there like the supervisor of the move, keeping a very close eye on a photo of his younger self to ensure we packed it extra carefully. 🍼


Somehow, in amongst all the packing, I had it in my head to make a silly video of His Royal Highness being ceremoniously relocated ….. as one does. 😆 I feel like we really created our own amusement as watching it now, I’m not laughing at what we’re doing but at how hard we’re laughing!! 🤣
Long live Prince Edward Dozer Maehashi the first! ❤️


