This post may contain affiliate links. Read my full disclosure policy.
This Mississippi Mud Pie is a true chocolate lover’s dessert, with layers of creamy, crunchy, and fudgy goodness in every bite.
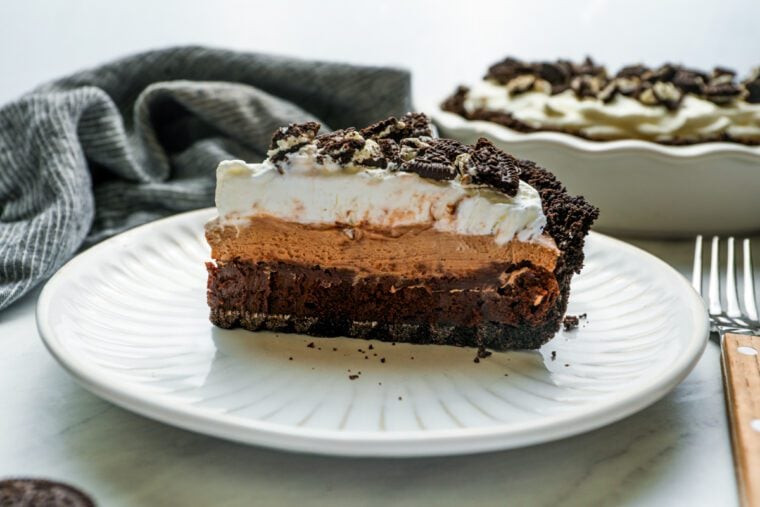
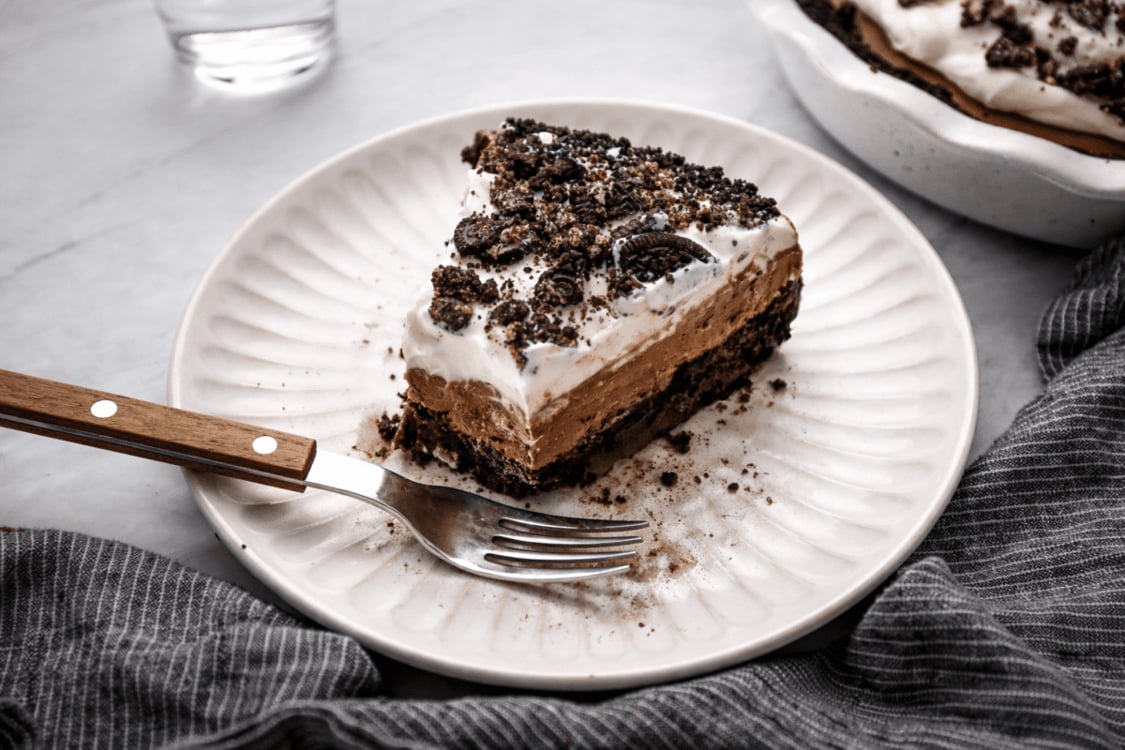
Mississippi mud pie is one of those unabashedly indulgent desserts. This is a classic Southern pie, usually made with a breadcrumb crust, a rich chocolate filling, and a generous layer of whipped cream. It is assumed that the name comes from the pie’s resemblance to the dark, muddy banks of the Mississippi River. My version features an Oreo crust, fudgy brownie base, silky chocolate mousse and whipped cream, plus lots of crushed Oreo cookies on top.
With four distinct layers, this Mississippi mud pie recipe takes a little time. But the reward is enormous. This is a totally wow dessert: impressive when sliced, delicious, and totally worth it when you want to go all out.
Contents
What You’ll Need to Make a Mississippi Mud Pie
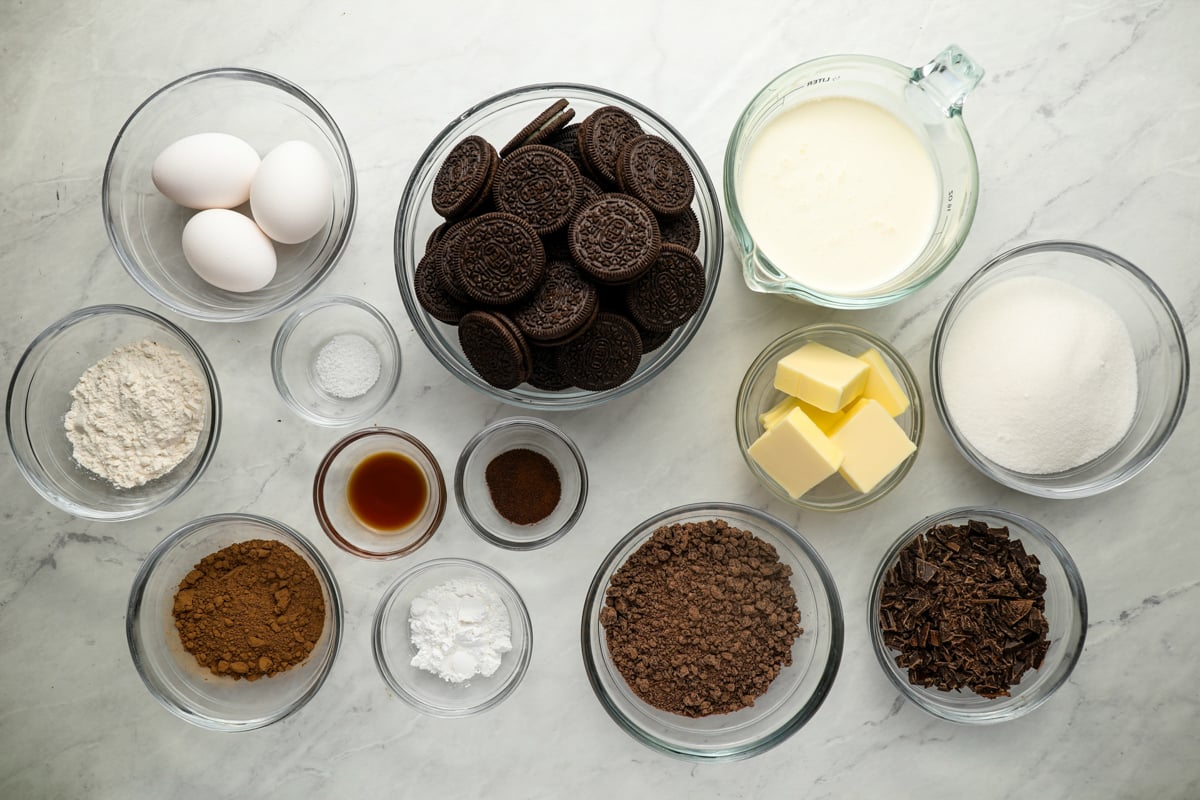
- For the crust: Oreos and melted butter
- For the brownie layer: Butter, bittersweet chocolate, flour, cocoa powder, espresso powder, sugar, vanilla extract, salt and eggs
- For the foam layer: Heavy cream, milk chocolate, icing sugar and salt
- For the whipped topping and finishing: Heavy cream, icing sugar and Oreos
- Access the printable recipe for precise measurements
Step by step instructions
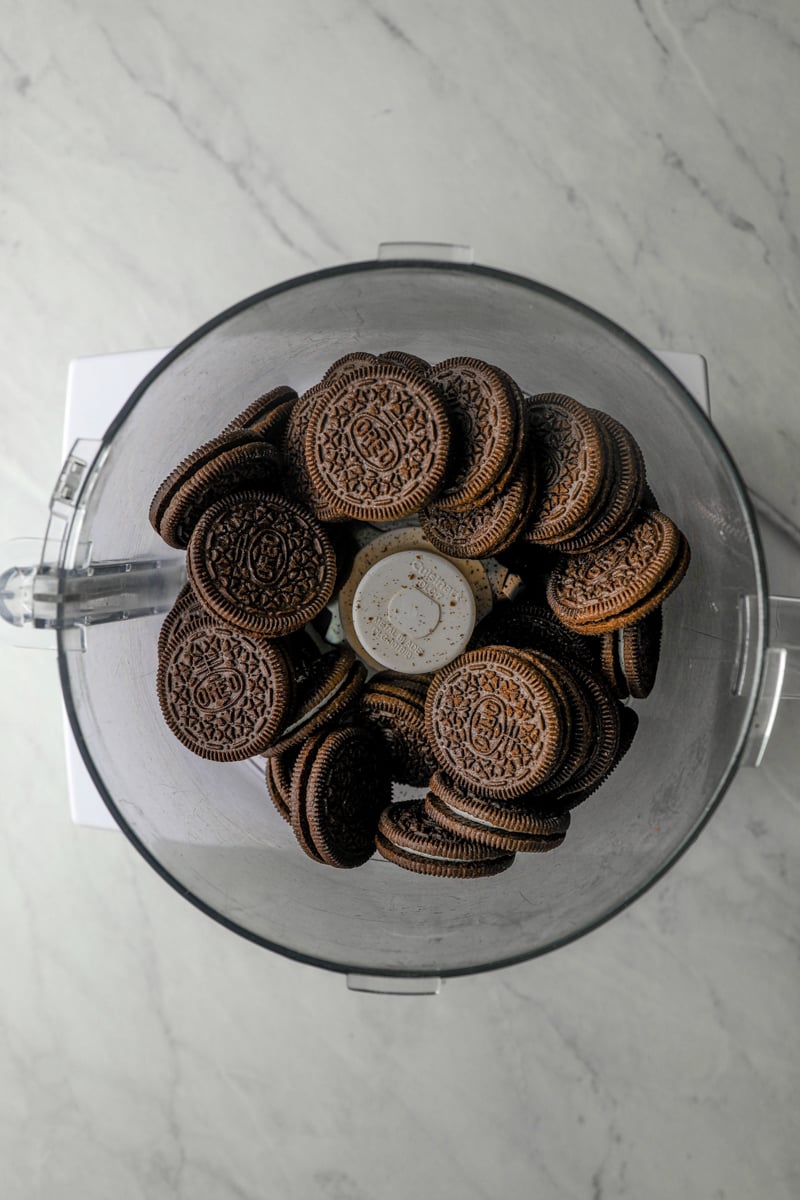
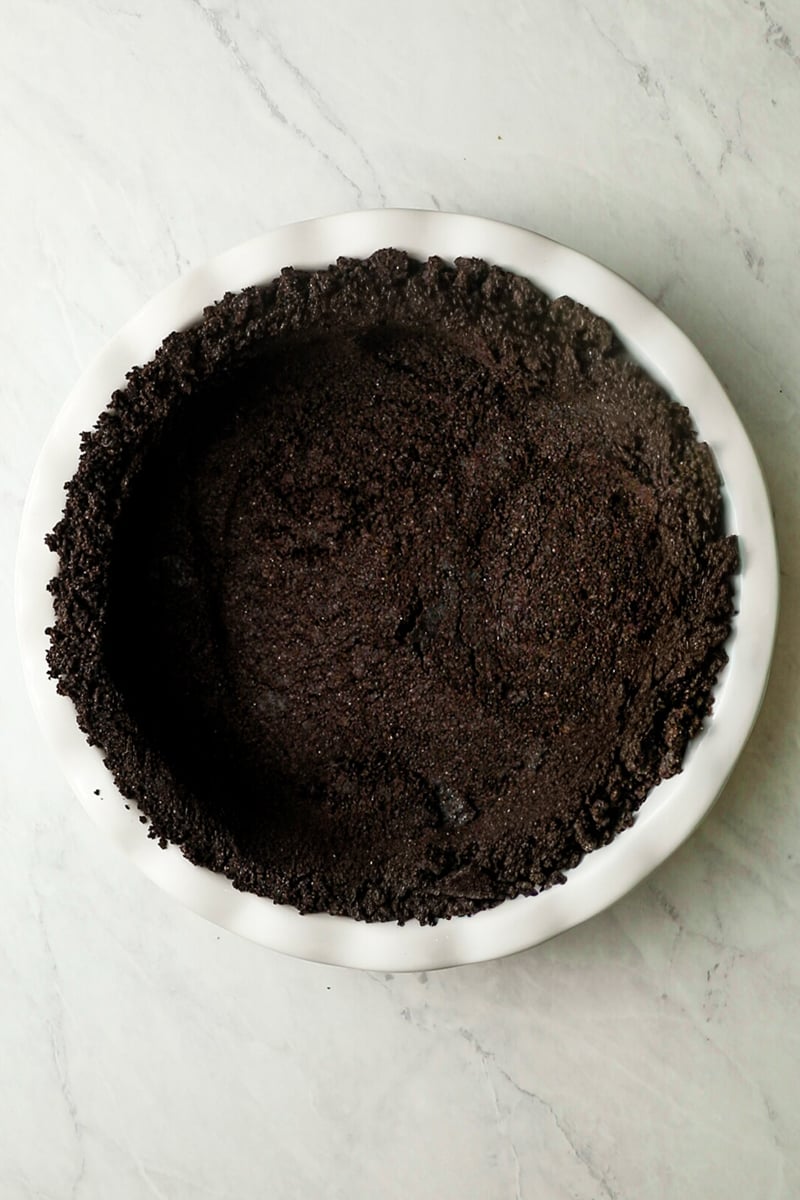
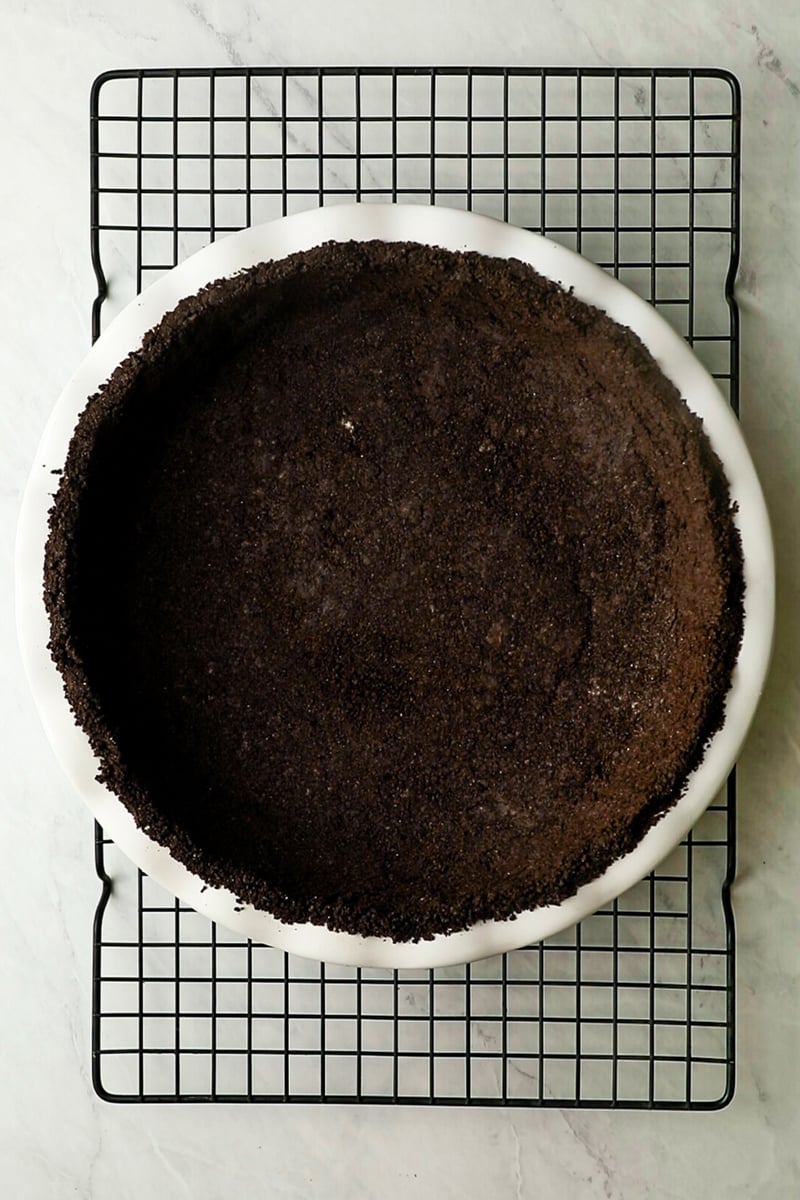
Step 1: Prepare the crust. Combine the Oreos and melted butter in a food processor and pulse until the breadcrumbs are finely ground and moistened. Press the mixture firmly into a deep pie pan, starting at the sides, then pressing the crumbs onto the bottom. Bake for about 10 minutes, until just set, then transfer to a rack to cool.

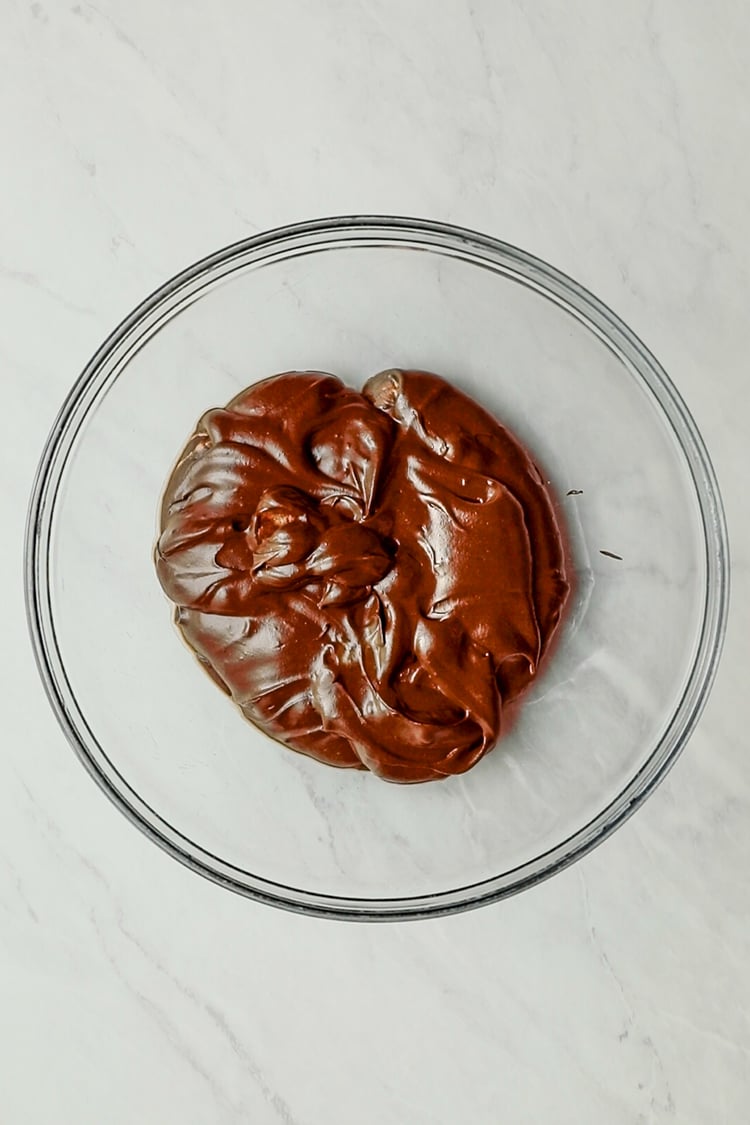
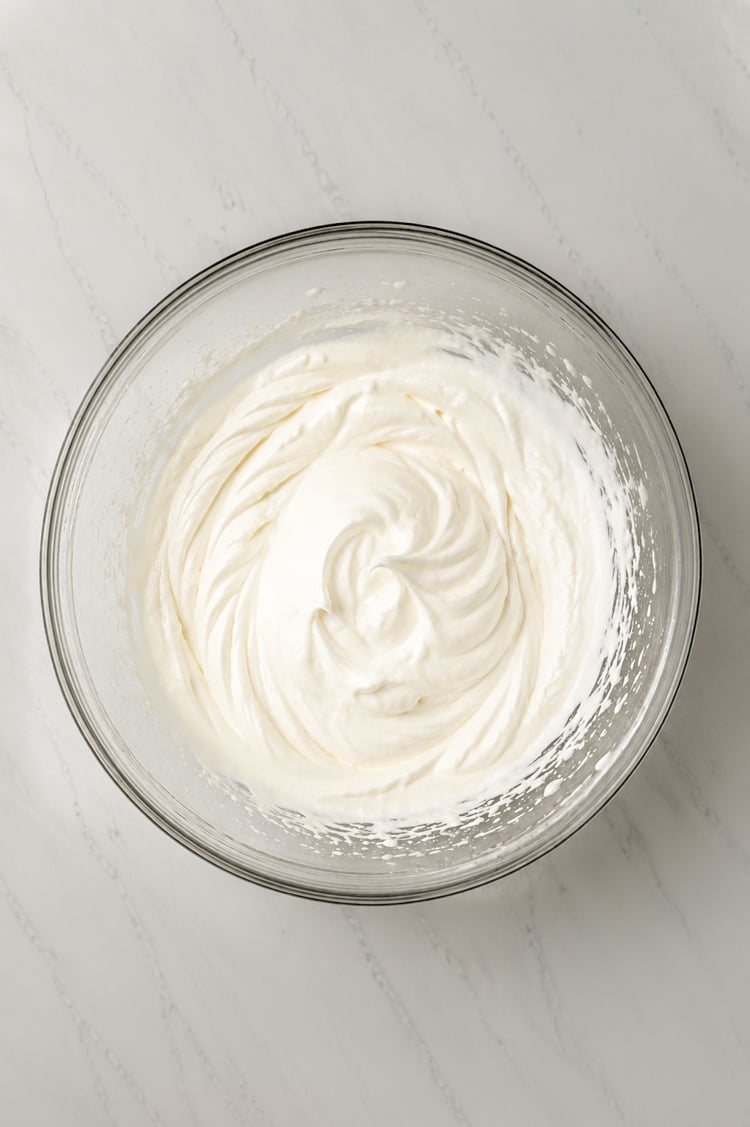
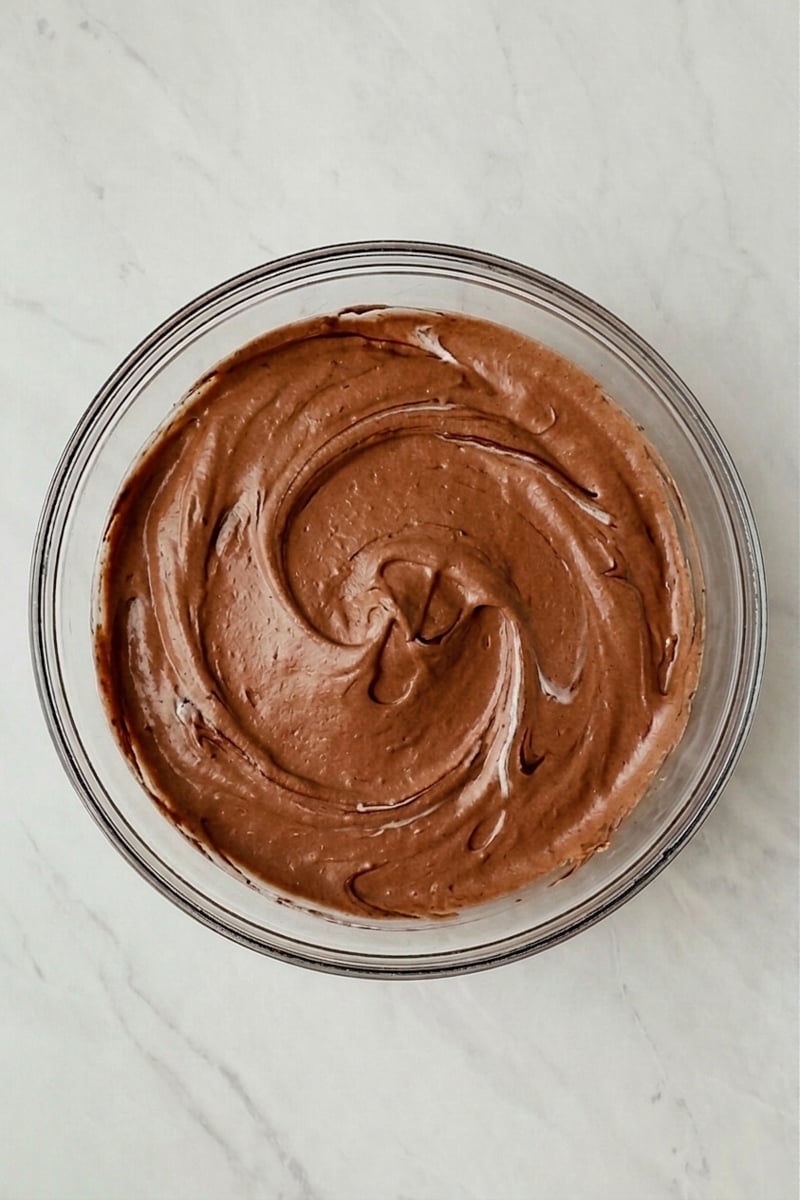
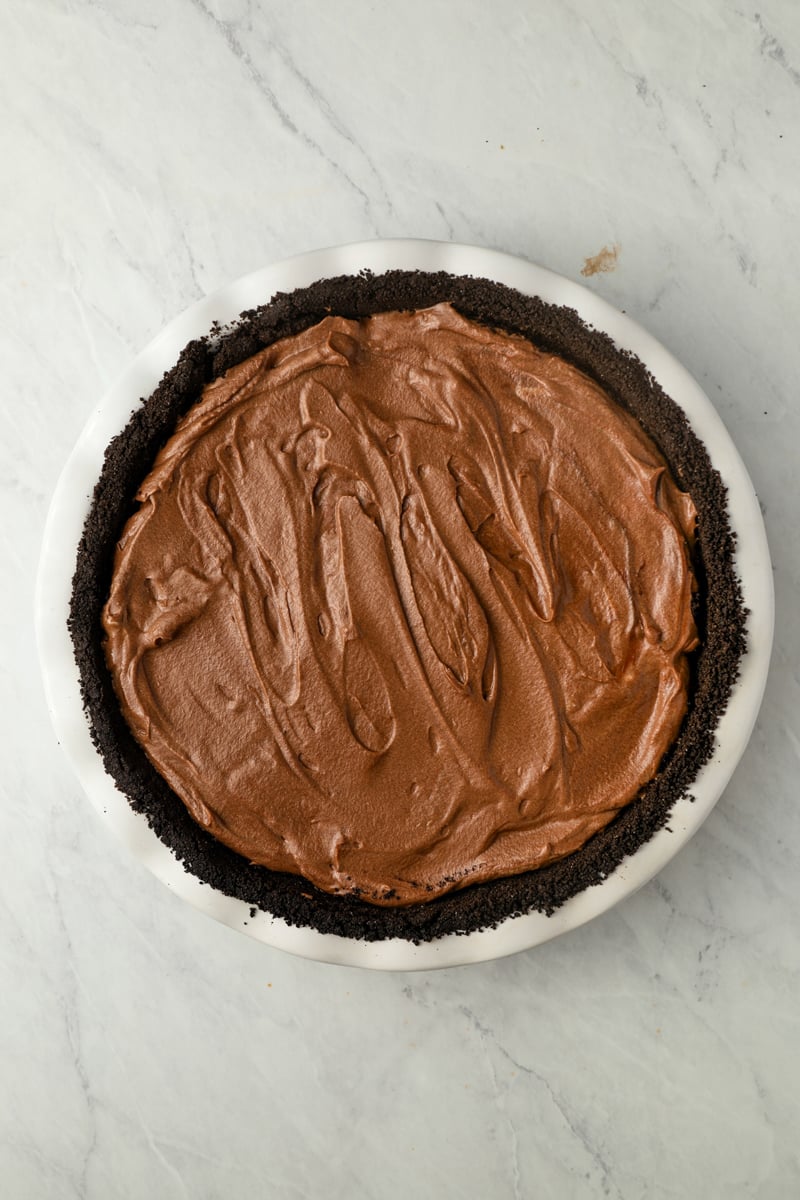
Step 3: Make the mousse. Heat ¼ cup of the cream until simmering, then pour it over the chocolate and whisk until smooth. Let cool until lukewarm. Whip the remaining cream with the icing sugar and salt until soft peaks form, then gently incorporate it into the chocolate mixture. Spread the mousse over the cooled brownie layer and refrigerate for at least 30 minutes, until it begins to set.
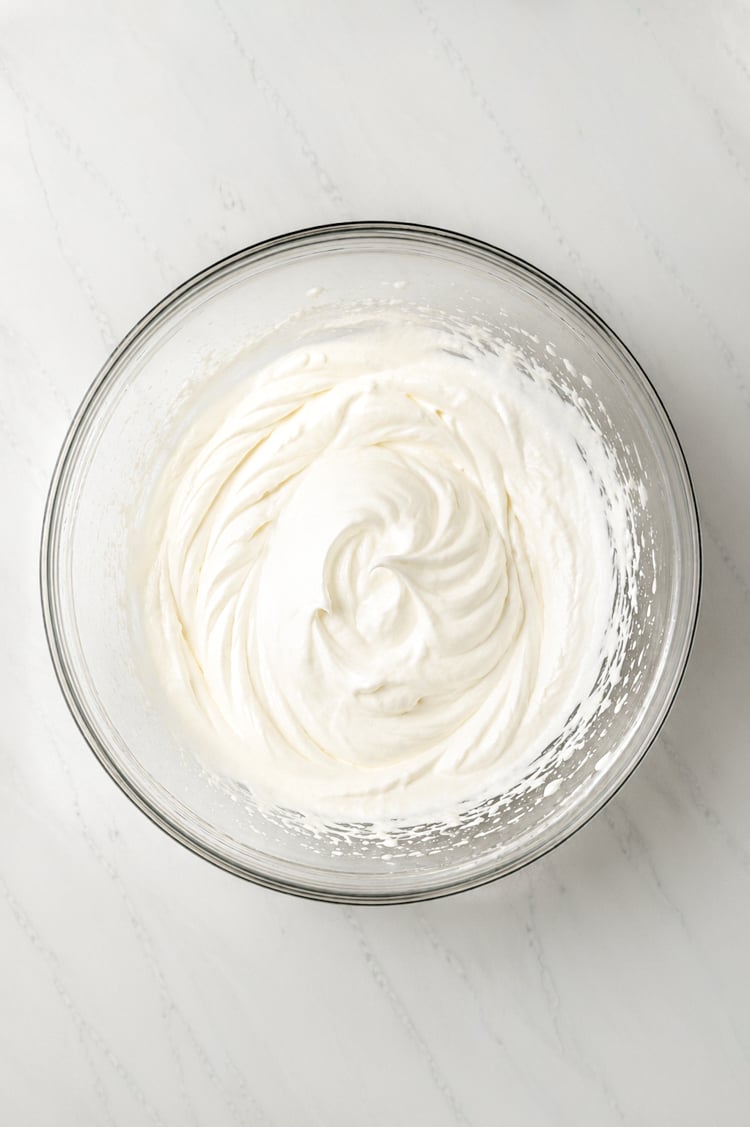
Step 3: Prepare the whipped cream filling. Once the mousse has cooled, whip the heavy cream and sugar until the cream reaches medium, silky peaks. Be careful not to crash too much: if you go too far, you won’t be able to go back. Spread the whipped cream on the tart.
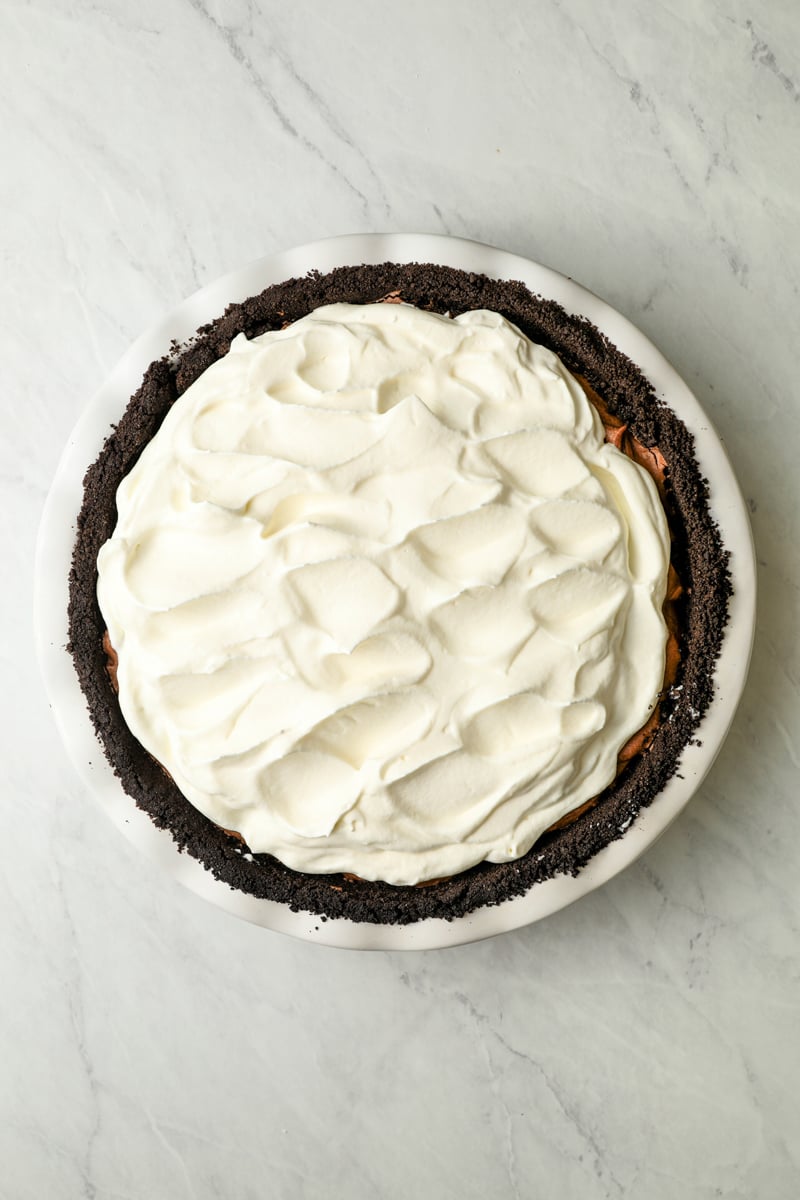
Step 4: Finish, refrigerate and serve. Generously sprinkle the pie with crushed Oreos, then refrigerate at least 4 hours, or overnight, before serving. Slice with a sharp knife, wiping the blade between cuts for clean slices. Appreciate!
More Decadent Pie Recipes You’ll Love
Mississippi Mud Pie

As rich and chocolatey as the name suggests, this Mississippi mud pie is completely over-the-top in the best way.
Ingredients
For the crust
- 30 Oreos
- 5 tablespoons unsalted butter, melted
For the brownie topping
- ½ cup (1 stick) unsalted butter
- 4 ounce bittersweet chocolate, chopped
- ¼ cup all-purpose flour, poured into a measuring cup and leveled
- ¼ cup unsweetened cocoa powder, such as Hershey’s
- 1 teaspoon espresso powder (optional)
- 1 cup Powdered sugar
- 1 teaspoon vanilla extract
- ¼ teaspoon salt
- 3 large eggs
For the mousse
- 1 cup heavy cream, cold, divided
- 6 ounce good quality milk chocolate, finely chopped
- 2 tablespoons icing sugar
- ⅛ teaspoon salt
For the topping and whipped cream finish
- 1½ cups thick cream, cold
- 2 tablespoons icing sugar
- 4 at 6 Oreos, roughly chopped or crumbled
Instructions
-
Prepare the crust: Preheat the oven to 350°F (175°C) and place an oven rack in the middle position. Combine the Oreos and melted butter in a food processor fitted with the metal blade and process until finely ground and evenly moistened. Press the breadcrumbs firmly into a deep 23 cm (9 in) tart pan, starting from the sides and then the bottom. Use the bottom of a measuring cup or glass to compact the crumbs and smooth the surface. It should be about 6cm thick. Bake for about 10 minutes, until just set. Transfer to a rack and leave the oven on.
-
Prepare the brownie topping: Melt butter in a medium bowl in the microwave. Add the chopped chocolate and stir until smooth, reheating in 20 second increments if necessary. Stir in flour, cocoa powder, espresso powder (if using), sugar, vanilla and salt. Add the eggs one by one until smooth.
-
Pour the batter into the hot crust and bake for 25 minutes, until almost set but still barely wobbly in the center (it will finish setting as it cools). Let cool completely on a rack, about 1 hour.
-
Prepare the mousse: Place ¼ cup (60 mL) cream in a medium microwave-safe bowl and heat until simmering, 30 to 45 seconds. Add the chocolate and let sit for 1 minute, then whisk until smooth. Reheat briefly in 10-15 second intervals if necessary. Let cool until warm to the touch, about 10 minutes.
-
In the bowl of a stand mixer fitted with the whisk attachment, combine the remaining ¾ cup (180 ml) cream, icing sugar and salt. Whisk on medium speed until thickened, then increase to high speed and whip until soft peaks form. The whole process should take 2-3 minutes. Stop before the cream hardens.
-
Stir about ½ cup of whipped cream into the warm chocolate mixture to loosen it and bring the two mixtures together in texture and temperature. Using a rubber spatula, gently fold the remaining whipped cream into the chocolate mixture in two batches, stopping as soon as no traces remain.
-
Pour the mousse over the brownie layer, smooth the top and refrigerate for at least 30 minutes, until the mousse begins to set.
-
Prepare the whipped cream topping: After the mousse has cooled for at least 30 minutes, place the heavy cream in a large mixing bowl. Using an electric mixer, whisk on medium-low speed until the whisk or beaters begin to leave streaks in the cream, about a minute. Add the sugar and beat on medium speed until the cream forms medium, silky peaks. This entire process should take 2 to 3 minutes. Go slowly towards the end; if it becomes grainy or curdled, you’ve gone too far. Spread the whipped cream over the filling, allowing some of the chocolate filling to show around the edges. Sprinkle with chopped/crumbled Oreos. Refrigerate for at least 4 hours (or overnight) to allow the mousse layer to fully set before serving. Slice with a sharp knife, wiping the blade between cuts for clean slices.
Remarks
Preparation instructions: The pie can be made up to 1 day in advance and stored in the refrigerator. Leftovers keep well in the refrigerator for a few days.
Nutritional information
Per serving (10 servings)Calories: 798kilocaloriesCarbohydrates: 75gProtein: 8gFat: 54gSaturated fat: 31gCholesterol: 166mgSodium: 300mgFiber: 3gSugar: 56g
This website is written and produced for informational purposes only. I am not a certified nutritionist and the nutritional information on this site has not been evaluated or approved by a nutritionist or the Food and Drug Administration. Nutrition information is provided as a courtesy and should not be construed as a guarantee. Data is calculated via an online nutritional calculator, Edamam.com. Although I do my best to provide accurate nutritional information, these numbers should only be considered estimates. Various factors such as types of produce or brands purchased, natural fluctuations in fresh produce, and how ingredients are processed change the effective nutritional information of a given recipe. Additionally, different online calculators provide different results based on their own nutritional data sources and algorithms. To get the most accurate nutritional information in a given recipe, you should calculate the nutritional information with the actual ingredients used in your recipe, using your favorite nutritional calculator.

